User Tools
Table of Contents
Generating and Downloading a Bitstream File Using Vivado
In order to download a module you have built to your Nexys 4 board, you must make a bitstream file. Be sure that you have first added an XDC file to your project as it is what makes the connections between your design and the board's inputs and outputs. If you have more than 1 XDC file, right click the ones you don't want to use and click disable. You can re-enable them later when you want to use them.
Generating a Bitstream File
- In Project Manager, make sure that the module you're planning on downloading to the board is selected as the top module.
- If it is the top module it should have a little icon with three squares next to it.
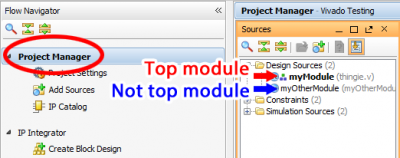
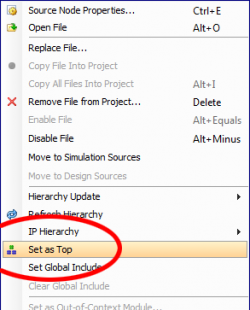
- If the module you want to download to the board is not the top module, right click the module in the Project Manager and click Set as Top.
- If you have multiple XDC files in your project, you have to disable the ones that you don't want to currently use.
- Right click on each file you don't want to use. Click on Disable file.
- Click Generate Bitstream under Program and Debug.
- If a window pops up titled No Implementation Results Available, click Don't show this dialog again and then click Yes.
- If a window pops up titled Synthesis is Out-of-date, do NOT click Don't show this dialog again. Whenever this window pops up, ALWAYS click Yes. This will ensure that you're always using the latest save of your files.
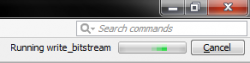
- Wait for your bitstream to be generated. This may take a few minutes. For big projects, it may take even longer! If it's still generating the bitstream file, you'll see a little progress bar in the top right of the Vivado window.
- Eventually, the bitstream generation will be finished!
- If there are errors, a window will pop up saying so. It is recommended that you do not click Don't show this dialog again so that you'll easily know when your project has errors. Click OK. If it doesn't automatically show up, open up the Messages tab near the bottom of the window. Make sure that Errors is selected and then read the errors to find out what went wrong. If those errors are unhelpful, check the Log tab also.

- If everything works out great, a window will pop up titled Bitstream Generation Completed. It is also recommended that you do not click Don't show this dialog again on this window. Click Open Hardware Manager then OK
Downloading a Bitstream File
You can download a bitstream file to the Nexys 4 board right in Vivado.
- Under Program and Debug click on Hardware Manager (this should be open already if you clicked Open Hardware Manager after generating a Bitstream file).
- Click on Open Target.
- Click Auto Connect.
- Select the option that says something along the lines of localhost:60001,localhost:… if it is there.
- If that's not already there, you'll have to click Open New Target… to find it.
- Click Next, then Next again.
- Wait for Vivado to connect.
- Make sure that the xilinx_tcf type board is selected that has a 15000000 JTAG Clock Frequency. Click Next.
- Auto Connect will usually work instead of Open New Target…, eliminating the need to pick the specific part. If this causes you problems, use Open New Target… instead.
- Now click Program Device under the Hardware Manager.
- Select the board, xc7a100t_0.
- A file selection window will pop up. By default, this will select the last bitstream file that you downloaded, so you may need to change it by browsing for it. Then click Program.
- Wait for Vivado to finish programming the Nexys 4 board. It shouldn't take very long. When it is finished, the progress bar window will go away.
- You can now use the Nexys 4 board with your module!
Testing and Pass Off
Once your bitstream is downloaded to the Nexys 4, test it. If your tests determine that everything went well, you'll want to make a copy of your bitstream file so that it doesn't get overwritten by generating another bitstream by following the steps below.
- Create a new folder in your project folder and name it Bit Files.
- Find your latest bistream file by navigating to your project's folder then to
<lab name>.runs / impl_1.- Sort the files by type to quickly find your
.bitfile.
- Copy the
.bitfile to the Bit Files folder you created in step 1.
